A Flowchart It is such a useful tool and so easy to do, that it is not necessary to complicate ourselves with advanced software to do it; if you have Microsoft Office on your computer Excel, with this tool it will be more than enough to obtain a very good result.
Stay with us because here at webyempresas.com we will explain what it is and how to make a flowchart in excel step by step in an easy and simple way.
Advertisements
However, before starting to make our flowchart it is necessary to understand the following basic concepts.
In this article you will find:
What is a flowchart?
A flowchart also called process diagram or activity diagram, is a form of graphic description in which the sequences of a logical process are represented, through the use of symbols and steps, which help understand a process as part of a whole.
Advertisements
The way in which the flowchart is structured must be clearly and systematically ordered, reflecting information in a concrete way in order to understand the process quickly and easily.
The process is the same regardless of the tool used to build the diagram; be it a sheet of paper, Excel, or other tools like PowerPoint or online tools.
Advertisements
symbols to use
To build the flowchart you must take into account the following symbology, because we must remember that each symbol reflects a different action or element within the process that should not be confused so that it is well structured.

Advertisements
If you want to see in more detail the correct use of symbols and more flowchart examples, follow our link.
Steps to make a flowchart in excel
Excel is an extremely versatile tool, making flowcharts with this tool is very simple, the best is that we can design our own flow chart according to the needs of the process we need represent.
Advertisements
To do so, we should only be guided by the basic functions and tools that Microsoft Excel; Let's see how it's done from start to finish step by step.
Step 1
Step one is to go to Microsoft Office programs and select the program Excel and create a new file to start our creative process.
Once it is an Excel sheet, we go to the upper left and in the menu bar we will find the insert option; Among the tools, we position ourselves on the shapes option, we can easily identify it by a small icon with three small shapes.
We click the left mouse button and we will find different options, among them the figures that we need for our Flowchart and we select each figure one by one that we need.

Step 2
Having identified the shapes we'll need, we add the arrows, then head back to the menu bar in the format option, we select each shape or arrow and customize the design.
It is advisable to increase the thickness of the arrows so that the sequence of the process can be better observed.

Step 3
We carry out the step to three in the same way, positioning ourselves on the option of formats and We go to the shape effects tool, there we will find several options to improve the aesthetics of design of our flowchart.
We can add shadows, borders, 3D effects, among others.

Step 4
As a fourth step, we start to make sense of the forms, adding the text to them; It is very important that we have previously identified the correct shape or figure for each process so as not to get confused.
The text should be a short and clear description; to add the text, we go to the menu bar, at the top left, we select the option that says “text”, several options will appear and we select the option text box.
Like the shapes, they can be customized, changing the color of the font and defining the interior of the text box as transparent, among other options.

step 5
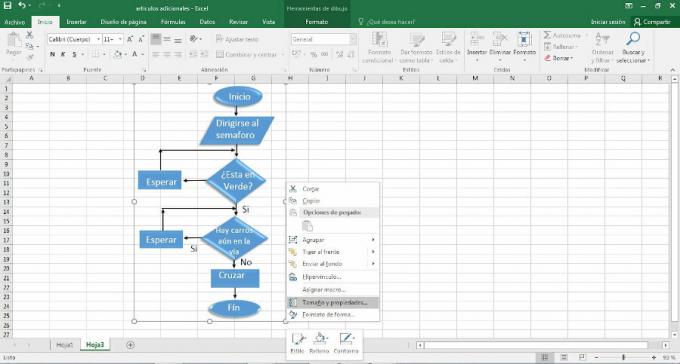
Once we have the entire flowchart ready, to prevent the design from being damaged, we select each one of the shapes, arrows and text boxes and we group it by right clicking with the mause.
In order for them to be grouped, it is necessary that we position ourselves on any of the shapes so that when we click, the group option appears.

Step 6
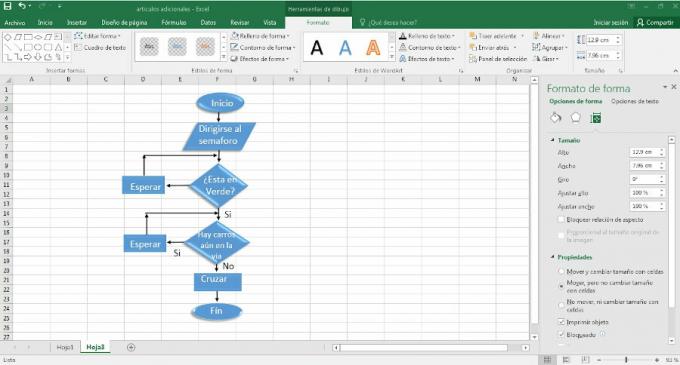
Since we are working with Excel, if we change the size of a cell, the shapes change size and can damage our layout, To avoid this, we select the already grouped diagram, right-click it with the mouse and go to the “sizes and sizes” option. properties."
Then we will get a tab on the right side to edit the shape format and we click on "move but not resize with cells," in this way we can drag our flowchart through the Excel sheet without altering the structure of our flowchart design.